G.A.C.K.
Game App Construction Kit
Introduction
What's in the Box?
G.A.C.K. started as a competition entry
to build a S.E.U.C.K. remake, based on the C64
original. Since then, many changes have been added so the workflow is easier to
understand and more comfortable. The current version G.A.C.K. is a lot more
than just a remake. It's a fully featured game maker with export options for
many target platforms.
With this App you can create games that can be played by a single person or with
two players simultanously on devices that allow the controls.
You should be able to distribute your game to many platforms. See the exports
section in this manual for details.
Features
GACK has a GUI that is much easier to use with a mouse
or touchscreen than with a joystick back then. OK, the Amiga version had that,
too, but then there was a very hard limit on visible sprites. That's gone, too.
You can produce the enemy occurrence you're used from games like "WarBus"
easily on modern hardware.
Did I mention this baby has pixel perfect(c)(tm) collisions for everything?
You can spawn attack waves at different
visible trigger-positions, thus entering one wave,
make ten enemies fly the same route.
The levels can scroll sideways, too. They start at the bottom and move upwards,
but when you make them wider than the screen, the players can move sideways, causing
the screen to scroll.
Options for horizontal scrollers and jump&run games have been added as well.
The image and animation editors
have copy/paste support and some other useful
features.
Saved game files are astonishingly small, too. (At least for this century).
How does it work?
Basically you just draw images as "Sprites", that's everything that moves,
and "Backgrounds", that's - yes - what not moves.
Next, you define how the animations for each player or enemy would look like.
Then you use the map editor to paint the levels on 2 layers. The background is just
for show. The foreground can optionally stop the players, or kill them.
After the scenery is set, you simply add a bunch of baddies, save the game and
heat the triggers.
Editor - Main Menu
Getting Started
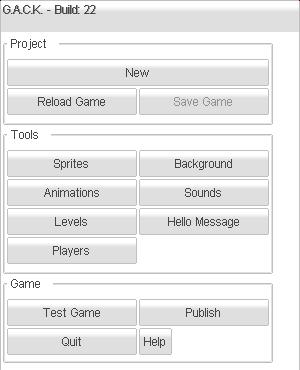
Once you passed the splash screen, you'll see a nice main menu for the editor. The
first thing you might want to do is load a demo game, and play it. Just klick on
the topmost button to get a file list with all the games on your device. Select
a game and press "OK" to load it.
Then fiddle with the exiting game, change a few bits here and there
before you finally
start your own work.
Project Management
When you return to the App, the last state is always restored. You can push the "Reload Game" button to load the last state that you explicitly saved. Pressing the "Save Game" button writes the changes to the document you are currently working on. You see, change or rename that project when you press the topmost button, that's named after your project.
Sprites + Background:
Image Editors
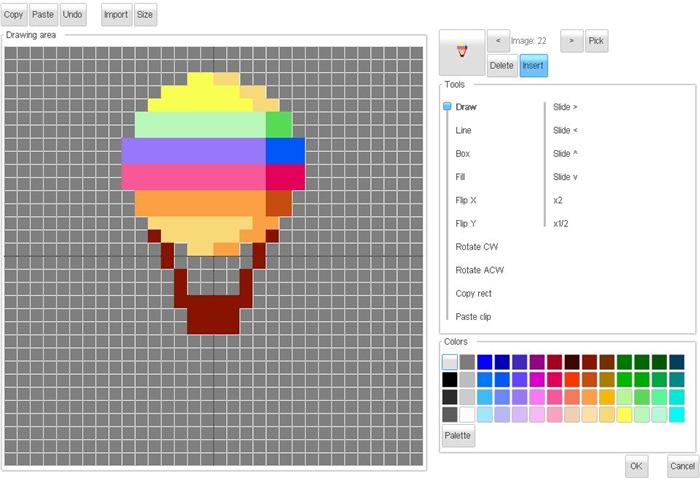
The sprite and background editor is an
easy to use paint program. At the right side, there's is a fixed colour palette.
You change the colour values by selecting a colour and press the "Palette"
button. Just paint your images on the grid at
the left side. The box right of that shows a 1:1 image of your sprite
If you press OK, the changes are stored. With Cancel you can discard all changes made
on the images.
Tools
In the toolbox
you find few tools as Draw/Fill/Flip/Rotate/Move that act on the full image.
Just play with it, it's no big deal.
Using the "Copy rect" allows you to grab a rectangular portion of the image -
just drag a rectangle. The "Paste clip" button inserts the block with the top
left corner at the clicked position.
Colours
The image editors have a palette of predefined colours. You can use these colours all through the
whole project.
The colour in the left bottom corner (silver buttons) is transparent. In the grid it will
be shown stippled.
Pressing the Palette button will allow you to change the colour value of a palette entry.
All images (sprites and background) will be affected by a change.
You can change the size of all background blocks or sprites with the "Size" button at the top of the dialog. Using the "Import" button allows you to load a set of tiles from a bitmap (png, bmp or jpg file) with a given grid size. The images are scaled to the size of your current background blocks or sprites when importing. Also, the colours are matched to the closest colour in the palette.
Animations
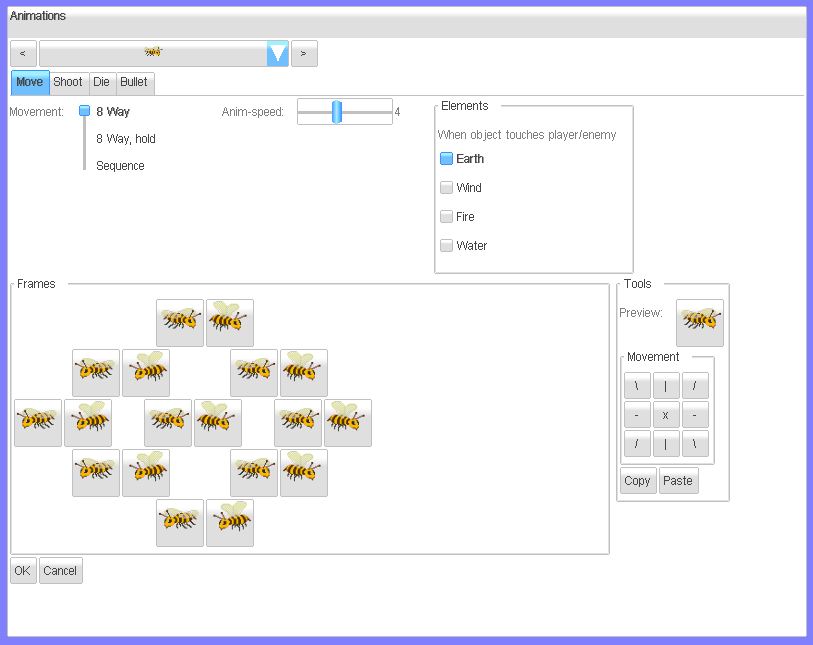
Here you define the animation frames for each player and enemy.
The top bar let's you choose the animation to edit. Then
press the tab strips to select animations for move (walking), shoot (when you hit
the trigger), die (when you hit the road) and bullet (that's what you spawn when hitting
fire).
You have the option to set:
- 8 Way (whatever direction you move will be used)
- 8 Way, hold (same as 8 way, but when you don't move, the direction is kept.
- Sequence, which will be played from frame 1 to the last frame. Here you have the option to add/remove a frame at the end of the sequence.
In any case, just click on the button for an direction/sequence, and choose the appropriate image from the list.
When you press the cursor keys, you can see the preview image moving.
The Speed slider lets you control the animation delay between each frame.
Again, OK=save, Cancel=void changes.
Sounds
Sound Picker

Here you have a list of sounds to add into your game. The Exists button indicates if
this sound is already defined as a waveform.
With the Edit button you can open the legendary Dr Petter's SFXR sound editor.
Synthesizer
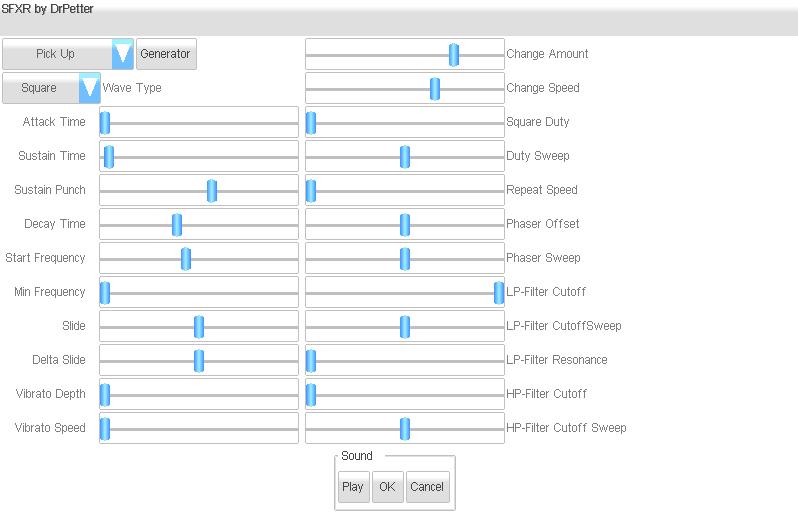 it might look a bt scary a tthe first look, but it's easy to use. Very.
Just start with the box at the top left corner. Pick a sound family that might
fit the sound you are looking for. Then press the Generate button until you hear a
random sound that sound just like the thing you need. Then play a bit with the various
sliders to adjust the sound. The Play button plays the newly generated sound.
it might look a bt scary a tthe first look, but it's easy to use. Very.
Just start with the box at the top left corner. Pick a sound family that might
fit the sound you are looking for. Then press the Generate button until you hear a
random sound that sound just like the thing you need. Then play a bit with the various
sliders to adjust the sound. The Play button plays the newly generated sound.
Level Editor
Introduction
The most complex thing in G.A.C.K. is the level editor. I really recommend reading
this section carefully. It's easy to use, once you got the idea behind it.
On the top you see tools to select the current level, and to remove it. When you
click ">" the program will ask you to create a new level when you reached
the last one.
Below that, there's the option to change the "Map" or edit "Waves",
which is the movement patterns of the enemies.
You can move this dialog around by dragging the caption bar.
With the middle mouse button, LCtrl pressed or two fingers on the screen, you can pan around.
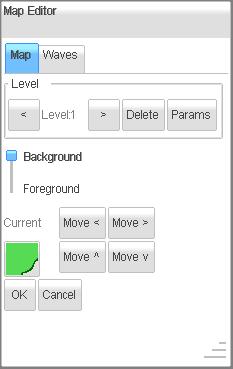
Map Mode
In map mode, there's a big button "Current", that shows the current block
to set. When you click it you can choose another block. The block "Eraser"
just cuts transparent holes in your map.
The background is just arts, the foreground can interact with the players (see Players
menu). The whole game has pixel perfect collisions, btw.
The game layers are as follows:
background > enemies > foreground > players > shots
As you see, you can move enemies below the foreground. That's useful for fancy effects,
like people coming from behind a house or hide behind a tree.
If you need the enemies above that layer, try to draw to the background instead,
and add dummy blocks to the foreground for collision (with just one pixel or so).
Also, the enemies are sorted by y position for each frame update. Sprites at the top of the
screen are drawn first.
The "move" buttons move the whole playfield. That's handy, when you have
to resize the map.
Params
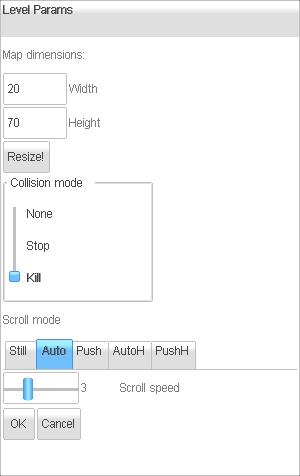
When you press "Level params", there's an option to resize the map, change
scrolling behaviour as this:
Still: no movement at all. Set a limited time for that. Used for bosses .e.g.
Auto: the playfield will scroll with a given constant speed. (e.g. Nemesis)
Push: The playfield moves, so the players are in the viewport. (e.g. Commando)
In Still mode, the enemies are spawned when their spawn point is in the visible
area of the screen. You can cause a delay for their appearance by making them move
for a time outside the visible screen.
Wave Mode
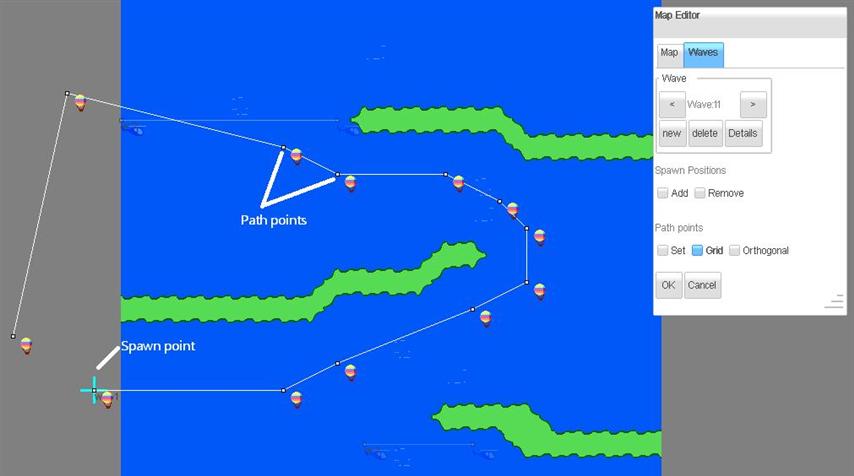
In wave mode you create new enemy attack waves, dynamic object that might shoot
collectable power-ups or other dynamic game content.
With the Wave- combo box you can pick the enemy waves already created or
append a new wave at the end of the list. Waves might be sorted by position eventually, so don't
get confused when that happens.
Next you should set the Details of the wave. The details editor is covered later. When you select
an animation in the details, the values from the last enemy with the same animation are preset.
That makes it easier to create new, similar enemies.
Now you can add path points. When you click the option New in tha pathpoints area, all previous
path points are removed and you can restart with the starting point.. The option Grid aligns your
placed points at the grid of the background blocks. When you place a path point, you can adjust the
position until you finally lift the click/tap.
Using the Orthogonal option, every neighbour point can only be vertically or horizontally be placed
on the same position as the previous set point. Thus, this diables diagonal offsets.
Details of a Wave:
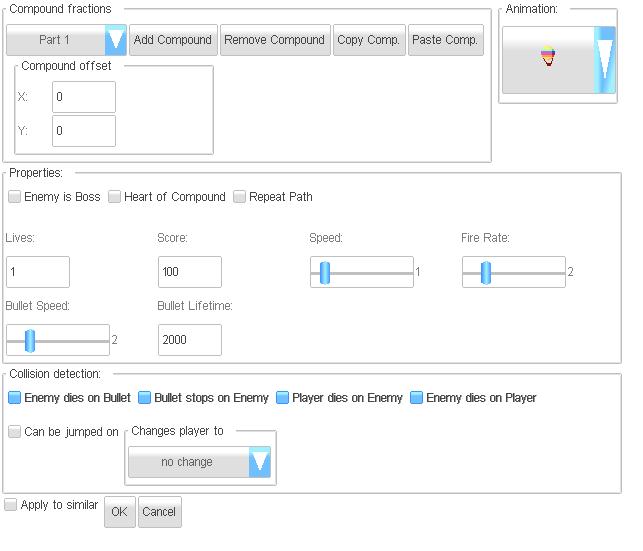
| Compound fractions |
You can add more compounds (parts) to one enemy, to build bigger enemies. Each compound
part has its own parameter, described below. Just remeber: G.A.C.K. sorts all sprites by Y (vertical) position, so that sprites at the top of the screen are drawn first. Have that in mind when you create compound enemies that overlap. |
||||||||||||
| Add compound | adds a new animation + behaviour to the compound list | ||||||||||||
| Remove compound | Remove the currently selected compound part | ||||||||||||
| Compound offset |
Here you specify how many pixels the compound part os offset to the path points
you enter. In the map - view, you will see the complete compound enemy preview. |
||||||||||||
| Animation | Select the animation from the animation list here. The editor will automatically set all the values below to the last (upmost) used settings applied to this animation. | ||||||||||||
| Lives | How many shoots can this one take to die? | ||||||||||||
| Score | Score you get when killing the enemy | ||||||||||||
| Fire rate | How many bullets per micro second. No, honestly try the fire rates until it feels right. | ||||||||||||
| Bullet speed | Bullet movement speed. In pixels per frame update. | ||||||||||||
| Bullet range | how far will bullets travel (in milliseconds. That's 1000 ms for a second.) | ||||||||||||
| Enemy is Boss | See below | ||||||||||||
| Heart of Compound | If you have a compound of enemies as one big enemy, you can select specific compound parts to act as a heart. When the heart is killed, the whole compounded enemy dies. | ||||||||||||
| Repeat Path |
With this flag, the enemy will skip to the first path point when it reaches the
last point. Without this flag, the enemies of all spawn points for this wave will align side by side at the end of the path. |
||||||||||||
| Collision detection |
|
||||||||||||
| Apply to similar |
This checkbox will apply these settings to all enemy objects with the same animation
on this level. This way you can easily change the behaviour for an enemy type, to tweak bullet speeds and such. |
How to clear a level:
a level is cleared, if both:
- you reach the top (scroll mode: auto/push) or the right (scroll mode: autoH,pushH) border of the map
- all bosses are shot or below / left of the visible screen.
Hello Message:
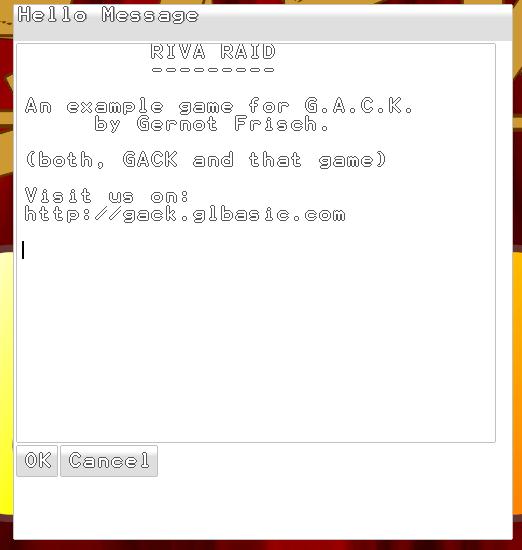
Here you can enter a message as a title screen. The message will be centred, but
as a block, not per line. So you can use ASCII art if you feel pervert.
Players
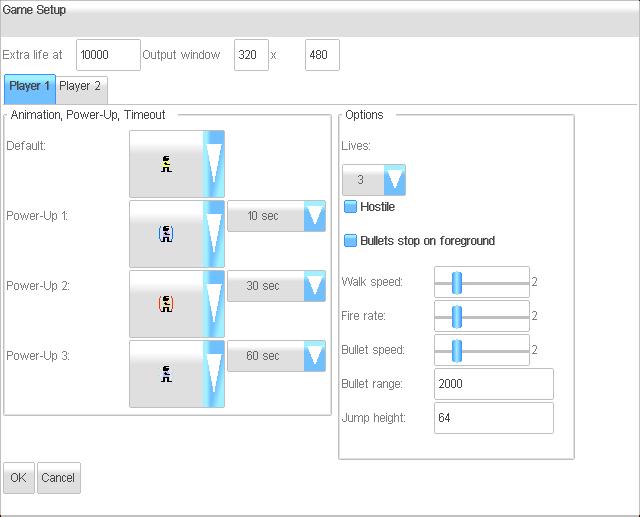
Specify the player behaviour for each player in this dialog. The current version
supports a hardcoded number of two players for G.A.C.K..
| Lives | Number of lives for this player. No continues. |
| Hostile | Is a player is "hostile", you can shoot him with the other player |
| Bullets stop on foreground | Well… |
| Walk speed | Same as foe enemy waves |
| Fire rate | just test this |
| Bullet speed | in pixels per frame |
| Bullet range | Bullet timeout in ms (1000 = 1 sec) |
| Jump height | The maximum height in pixels a player can jump in levels with gravity. |
Test Game:
Running, Testing, Debugging
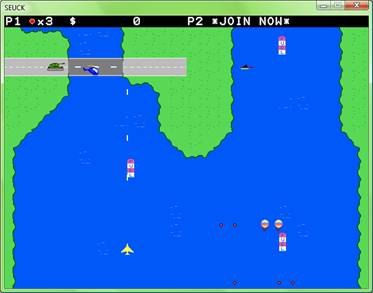
This is a test run of the game. If you press "q" or tap the score-bar, the testing will end.
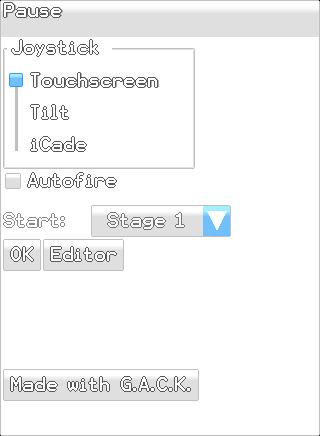
Before starting the game in editor mode, you can select the start stage from the pause dialog. In the
distributed game this option will be removed.
On a PC or Mac you can you can skip the current level in editor mode with the Page-Up key.
Movements for Player 1
Cursor keys + Left Ctrl / Joystick 1
Optional: Acceleration (Tilt), Touchscreen, Virtual OSD joysticks or
iCade/iControlPad)
Movements for Player 2
WASD + Right Ctrl / Joystick 2
Optional Virtual OSD joysticks (for touchpad devices with large screens)
Create Standalone
You can get a program on our website that lets you create standalone packages for several platforms from your created games. Just visit http://gack.glbasic.com .
Final Words
This game and all used material is
© by Dream Design Entertainment. That's the GACK game editor.
Not the games you create with it.
The SEUCK-player program is free of any rights, and you can distribute your game
with whatever-you-want license. with whatever-you-want license.
The games shipped with G.A.C.K., the used artwork and sounds are not the best quality, so
you can take whatever you want and do whatever you like with them.
Credits
Many thanks to Minion, who pointed me always the right direction when I was undeceive.
Kudos to LamptonWorm who initialized the idea.
Contact:
Gernot - KungPhoo - Frisch
www.glbasic.com – G.A.C.K. 100% GLBasic code.